Getting started with Trevis
Trevis is a visualization framework. You need to provide the data model. Doing so is easy. For example, assume we want to provide Trevis with a tree consisting of a root node with two children, a and b, where node b contains two children, ba and bb.
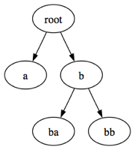
Trevis requires implementations of two classes: one representing a tree node, and the other representing a tree. Here is a simple example:
import ch.usi.inf.sape.trevis.model.AbstractContextTreeNode;

public class TreeNode extends AbstractContextTreeNode {
	public TreeNode(String label) {
		super(label);
	}
}
In Trevis, all tree nodes have what we call a frame. That frame needs to be passed to the AbstractContextTreeNode constructor. In this example, we call the frame label, and we use a String to represent it. We could use any other type (e.g., if you use Trevis to visualize calling context trees, the frame would correspond to a stack frame, which could include a method's name, class, and signature).
import ch.usi.inf.sape.trevis.model.AbstractContextTree;
import ch.usi.inf.sape.trevis.model.AbstractContextTreeNode;

public class Tree extends AbstractContextTree {

	private final TreeNode root;

	public Tree() {
		root = new TreeNode("root");
		final TreeNode a = new TreeNode("a");
		root.connectChild(a);
		final TreeNode b = new TreeNode("b");
		final TreeNode ba = new TreeNode("ba");
		b.connectChild(ba);
		final TreeNode bb = new TreeNode("bb");
		b.connectChild(bb);
		root.connectChild(b);
	}

	public ContextTreeNode getRoot() {
		return root;
	}
}
The tree class has to extend AbstractContextTree. All it is required to do is to implement the getRoot() method. We build the tree in the constructor of the Tree class, simply by creating a number of TreeNodes and adding them as children of other nodes.
Now we are ready to visualize our tree. We create a Java application that opens a JFrame. We create a TreeView, place it into that frame, and connect it to the tree.
import javax.swing.JFrame;
import ch.usi.inf.sape.trevis.swing.TreeView;

public class Main {
	public static void main(String[] args) {
		final Tree tree = new Tree();
		final JFrame frame = new JFrame("Hello Trevis");
		final TreeView view = new TreeView();
		view.setTree(tree);
		frame.add(view);
		frame.pack();
		frame.setDefaultCloseOperation(JFrame.EXIT_ON_CLOSE);
		frame.setVisible(true);
	}
}
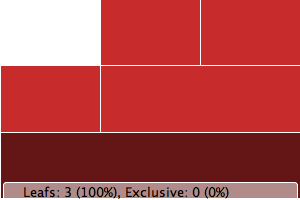
The result looks as follows. The 5 rectangles represent the 5 nodes. The bottom rectangle represents the root node. It is colored in a darker shade because the mouse was hovering over it while we took the screenshot. The tree grows from the bottom to the top (the left rectangle above the root corresponds to node "a"). The width of a rectangle corresponds to the number of leafs in the subtree rooted at that rectangle (e.g. the subtree rooted in node "a" contains only one leaf, but the subtree rooted in node "b" contains two leaves, and thus "b" is twice as wide as "a").
If we would like the nodes to contain their labels, we have to configure the TreeView accordingly. But first we need an "attribute" that can extract the label (a String) from a TreeNode. Let's call that attribute a LabelAttribute. This attribute's evaluate() method extracts the label from the node by just getLabel().
import ch.usi.inf.sape.trevis.model.ContextTreeNode;
import ch.usi.inf.sape.trevis.model.attribute.StringAttribute;

public class LabelAttribute extends StringAttribute {
	public String getName() {
		return "Label";
	}
	public String getDescription() {
		return "Represents the label of the given tree node";
	}
	public String evaluate(ContextTreeNode node) {
		return node.getLabel().toString();
	}
}
Given this attribute, we can configure the TreeView with a simple call:
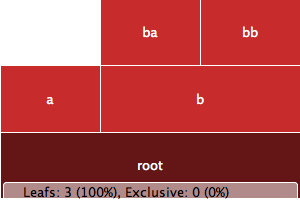
view.setLabelAttribute(new LabelAttribute());
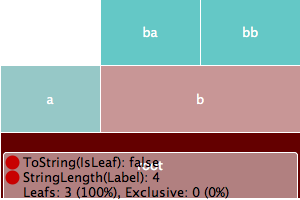
The resulting tree already looks a bit better:
Trevis can color tree nodes based on an attribute. That attribute is called a hue attribute. We can call TreeView.setHueAttribute() to tell Trevis how to compute the hue. A hue attribute needs to be a StringAttribute (an attribute that takes a TreeNode and returns a String). Trevis will build a hue map, mapping each unique string to a unique hue. Let's color the nodes by their names:
view.setHueAttribute(new LabelAttribute());
The result is not very exciting, because in our simple example, each node has a different name (and thus a different color).

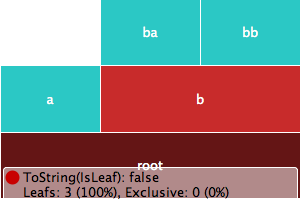
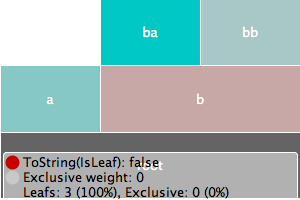
In Trevis, attributes can have different types. For example, Trevis provides a built-in attribute, IsLeafAttribute that returns whether a node is a leaf. That attribute is a BooleanAttribute (it returns a boolean value, true or false). The hue attribute, though, has to be a StringAttribute. Trevis provides built-in attributes to convert between types. One of these is ToString, which casts any attribute into a StringAttribute. By composing ToString and IsLeafAttribute, we can now color all leaf nodes in a separate color.
view.setHueAttribute(new ToString(new IsLeafAttribute()));
Trevis uses the HSB (hue, saturation, brightness) color model. In the above steps, we have defined the hue. Usually, we use the hue to differentiate between distinct categories of nodes. Trevis also provides a way to affect the saturation of a node. For that, we can call TreeView.setSaturationAttribute(), which expects a LongAttribute (an attribute returning an integral value of type long). Let's saturate a node's color proportionally to the length of its label. This way, nodes with long labels will stand out.
view.setSaturationAttribute(new StringLength(new LabelAttribute()));
An AbstractContextTreeNode does not have to be as simple as our original TreeNode class. A node may store all kinds of additional information. For example, it could store something like a "weight", as in the WeightedTreeNode:
public class WeightedTreeNode extends AbstractContextTreeNode {
	private final long weight;
	public WeightedTreeNode(String label, long weight) {
		super(label);
		this.weight = weight;
	}
	public long getWeight() {
		return weight;
	}
}
Then, we could create the tree as follows:
	public Tree() {
		root = new WeightedTreeNode("root", 0);
		final WeightedTreeNode a = new WeightedTreeNode("a", 10);
		root.connectChild(a);
		final WeightedTreeNode b = new WeightedTreeNode("b", 5);
		final WeightedTreeNode ba = new WeightedTreeNode("ba", 30);
		b.connectChild(ba);
		final WeightedTreeNode bb = new WeightedTreeNode("bb", 5);
		b.connectChild(bb);
		root.connectChild(b);
	}
For Trevis to be aware that there is more about the tree node than a "label", we need to provide a new attribute class, e.g. called WeightAttribute.
public class WeightAttribute extends LongAttribute {
	public String getName() {
		return "Exclusive weight";
	}
	public String getDescription() {
		return "Represents the exclusive weight of the given tree node";
	}
	public long evaluate(ContextTreeNode node) {
		return ((WeightedTreeNode)node).getWeight();
	}
}
Then we can use this attribute, for example to color (saturate) the nodes by their weight.
view.setSaturationAttribute(new WeightAttribute());
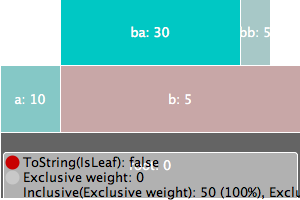
This leads to the following visualization:
While representing a numeric attribute of a node as a color (resp. as the saturation) may be useful, the main approach to visualizing a numeric attribute is by sizing the node accordingly. However, for this to work, the attribute needs to be inclusive (that is, the value for a parent node needs to be at least as big as the sum of the values for its children). The WeightAttribute is not inclusive. However, Trevis provides an attribute that computes the inclusive value given an exclusive attribute. Using that attribute, we can now control node size as follows:
view.setSizeAttribute(new InclusiveLongAttribute(new WeightAttribute()));
The resulting visualization looks as follows:

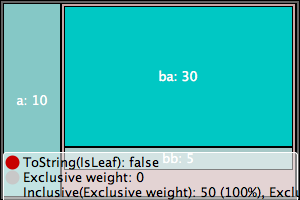
If we would like to include the node weight in the name rendered inside the rectangle, we can do this just by composing attributes, as follows:
view.setLabelAttribute(new StringConcat(new StringAttribute[] {
  new LabelAttribute(),
  new StringConstant(": "),
  new ToString(new WeightAttribute())
}));
This produces the following result:
Trevis supports different kinds of tree visualizations. The linear view shown above is just one example. In order to support other kinds of visualizatons, the API comes bundled with some built-in renderers: LinearRenderer, RadialRenderer, TreeMapRenderer and HighriseRenderer.
The following code snippet shows how to use TreeMapRenderer:
final TreeView view = new TreeView(new TreeViewRenderer[] {
  new TreeMapRenderer()
});
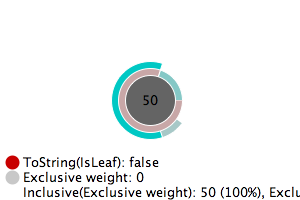
Yet another example is the RadialRenderer:
final TreeView view = new TreeView(new TreeViewRenderer[] {
  new RadialRenderer()
});
Here the root is the center of the concentric structure. The nodes are represented as ring segments. The visualization is similar to the LinearRenderer, except that the rectangles are wrapped around the circle (instead of affecting the width of a rectangle, the size attribute affects the angle of a ring segment).
The TreeView constructor takes an array of TreeViewRenderers, thus, one can provide more than one renderer. The TreeView then provides a menu item (in its popup menu) to switch between the different renderers. Note that the first element in the array is the renderer used initially.
The following code snippet shows how to include all the renderers available in the standard Trevis distribution:
final TreeView view = new TreeView(new TreeViewRenderer[] {
  new TreeMapRenderer(),
  new RadialRenderer(),
  new LinearRenderer(),
  new HighriseRenderer()
});
Publication Highlights
OOPSLA'15 - Use at Own Risk
PPPJ'13 - Jikes RVM Debugger
PLDI'12 - Algorithmic Profiling
OOPSLA'11 - Catch Me
ECOOP'11 - Beauty and Beast
PLDI'10 - Profiler (In)Accuracy
ASPLOS'09 - Measurement Bias
More...
Blast
Our framework for bytecode-level information-flow tracing of Java programs.

Jikes RDB
Working with the Jikes RVM? Use Jikes RDB for debugging your VM hacks.

Now built on top of LLDB, so it works on OS X and on Linux.